
My good friend Roberta just had an adorable little baby boy this past week! We finished his nursery just a few days before he was born. This nursery was the most challenging space I have ever had the privilege to work on. My style and Roberta’s are almost polar opposites! My dream room would be totally neutral. White paint on the walls, lots of texture, lots of wood, and hints of black. Roberta on the other hand loves colour. And the woman knows what she wants! I told her jokingly a couple of times that I wasn’t sure why she hired me, because my original design plan for the room looks nothing like the end result. However, through much back and forth and compromises from both of us, the room did come together and it is such a happy space for a nursery. Roberta loves it and while it was way outside my comfort zone, I love it too.
Picking the Right Nursery Colour
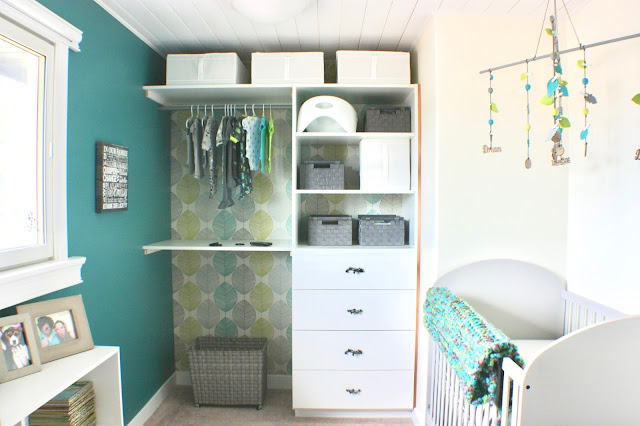
The room is quite a small space for a bedroom and was painted an almost neon blue colour. It is hard to capture how bright the blue was in the before pictures. When you look at them, just think even more neon.The plan was to have two blue walls and two cream walls, as a compromise with her husband who likes neutral colours. Roberta really loved the existing neon colour and wanted to colour match it for the two blue walls. Instead, I found a very bold, lovely colour that was similar but had a lot more depth and warmth to it. The colour is Vardo from Farrow and Ball. Y’all, I was worried. This is a small space and while painting all the walls a lighter more neutral colour would make it feel bigger, it would not have been Roberta at all! In the end, the room turned out beautifully and gives you a smiley, happy feeling when you look at it.

Designing the Closet Space
Roberta wanted to have an open closet with some sort of wallpaper or stencil on the back of the closet. She also knew her colour scheme and she wanted turquoise, lime green, grey, and white to be featured. I hunted down this amazing wallpaper that looked so nice with the Vardo paint colour. I called and emailed people across the globe looking for it, and was finally able to order it into Benjamin Moore. It’s just perfect. The turquoise matches the Vardo colour perfectly and even the background is the same colour as the cream on the walls. We really had to twist Roberta’s husband’s arm to get him to put the paper up, and I’m so glad he agreed. It really does make the closet space extra special.

Roberta wanted to maximize the use of the closet by removing the doors and the heading around the closet opening. It makes the space feel much larger, and adding grey and white baskets for storage made the open closet feel neat and tidy even without doors to close.

Adding Planks to the Ceiling
Something else I suggested was to plank the ceiling to cover the popcorn. I had first mentioned the idea because we were hoping to move the light and get an interesting light fixture. The light is in such a random place in the room! However, it turned out that moving the light wasn’t a logistically feasible option due to how the house was structured, but they still really liked the planked ceiling idea. I love the way it turned out. We bought a very simple white light fixture so that it would blend in as much as possible with the ceiling. Since it’s in such a random, off-centre spot on the ceiling, my goal was for it to be the least awkward it can be. When you take in the whole room you really don’t notice it.

Creating a Reading Space
Roberta really wanted a bookcase for baby’s books and toys. I found a bookshelf at IKEA, but the website said it was out of stock. Roberta went and found one on display and convinced them to sell it to her! It is just the right size for the small room.

Let’s talk about the chair corner. Roberta has a chair that she loves and wanted in the room. I think I tried to convince her to change the chair five times. She is a very patient friend. The chair is really big, BUT it is super comfortable and the perfect chair for nursing or baby cuddles. My biggest problem with it was that it has a 70s floral pattern, which really doesn’t go with anything else we were doing in the room! So, we compromised and covered it with a grey slipcover. It really is the kind of chair that once you sit down you don’t ever want to get up out of it.
I found a footstool at a garage sale for $5.00 that is nice and heavy and swivels so it is perfect for Roberta to rock the baby with her feet up. They painted it white and recovered the fabric in the same grey as the chair. We added a small stool with a lamp for nighttime feeding and as a place for her to put a glass of water.

Adding Special Touches
Unfortunately, we didn’t get the art completely finished before the baby came. Underneath the two pictures of their other adorable kids, Wade is going to add a shelf with more pictures on it to balance the art on the other side of the chair. The wood art above the chair was a last minute DIY. Roberta really wanted a sign with a special saying on it. We couldn’t find anything that was the right look for the right price, so I made one instead. She and Wade chose the saying, and we threw it together. The wood is stained grey to tie in with all the other grey in the room, and Roberta made the driftwood leaf.

Roberta chose a grey crib from IKEA and it ties in with the room so nicely. We also found a blanket she had made ages ago that could have been the inspiration for the room. It was exactly the colour scheme she wanted! We knew we needed a big piece of art or something above the crib, and I asked Roberta if I could make her a mobile. She agreed and I went outside my comfort zone again and I made her a mobile. The crib area is so sweet.

The mobile fills out the space above the crib so nicely while still keeping it airy. I made the mobile based on the colour scheme and the wallpaper.

This project was such a challenge for me but I really love the way it turned out in the end. It is such a happy, colourful, and warm room. Roberta’s oldest son likes to just sit in the room and take it all in. Baby Oliver was born this past week, and I hope he enjoys his new room as much as we do!
If you would like an interior decorating consultant for the finishing touches on your home, visit my services page.